Thonny Guide
On this page:
Thonny is a free program that you can use to interact with microcontrollers that run on MicroPython, like the microcontroller in yout kit. With Thonny, you can send and receive information from your microcontroller by typing computer code.
Getting started with Thonny
Download Thonny here and follow the installation instructions: https://thonny.org/
Connect your microcontroller to the computer using the USB cable and then open Thonny
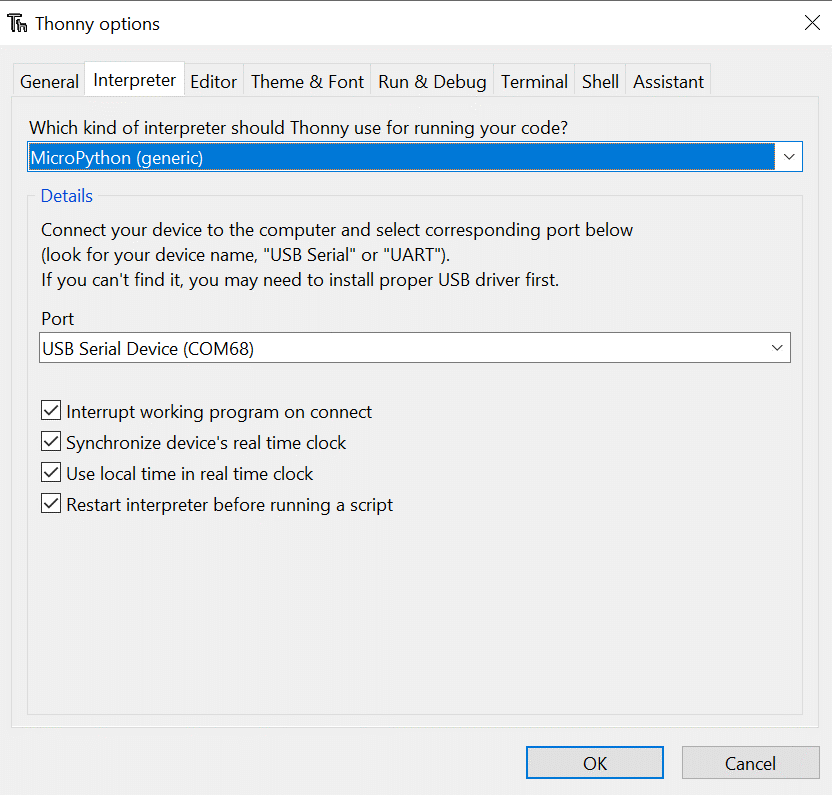
To connect to the microcontroller click Tools > Options > Interpreter. In the Interpreter tab, select MicroPython (generic) in the top drop down menu. In the Port drop down menu, select the option for USB Serial Device as shown below. If you have a Mac, the port name may include “dev/tty.cu.usb…”
Once connected your Thonny screen should look like the diagram below. Upon connected there will be lots of text output to the Shell that shows the progression of initializing the various sensors and components you might have connected to your microcontroller. Once the text output stops and get set the >>> prompt you are ready to type commands.
There are windows to see the files on the microcontroller and files on your computer. You should also be able to access the Editor (top window) to edit files currently on the board and the Shell to type real-time commands to the microcontroller. NOTE: It is not advised that you edit any code files on the microcontroller EXCEPT for user_params.py in the SetUp folder which is required for the data logger setup.

If you having trouble at any time, you can reboot your session at any time and start fresh by hitting Ctrl + d in the Shell.
If you have your microcontroller connected for a while, more text reading “Timer irq…” may appear to the Shell. Hit Enter to get the >>> prompt back so that you can type a command.
If your Thonny window does not show the Files panel, click View and check Files in the drop down list.
Troubleshooting in Thonny
Often times in sensor building, your sensor may not work perfectly the first time. It is common for people to encounter problems that they need to troubleshoot. The most common errors arise from incorrect or loose wire connections or misspelled code commands.
If you find your sensor does not work, double and triple check all of your connections. Make sure you haven’t switched the position of wires or that you have plugged wires into breadboard positions that are actually connected to the rest of your circuit.
Also, it is important to type your code EXACTLY as it is written in the instructions including capital letters and underscores in the correct places. The microcontroller does what you typed, not what you meant to type. It can be frustrating and difficult to catch when you miss one small thing like a single incorrect character or letter. But don’t worry, this happens to everyone, even the most advanced programmers!
Common error messages in Beagle Term:
- SyntaxError: Invalid Syntax – This means you have typed something wrong. Maybe you have forgotten a “)” or a “:” somewhere.
- ImportError: No module named “…” – You will get this if you misspelled the name of a module you are trying to import. For example if you type “import read_temps” instead of “import read_temp” you will get this error because your micrcontroller does not have a module called “read_temps” to import.
- AttributeError: Module object contains no attribute “…” – You will get this error if you misspell the name of the function within the module you are trying to use. For example if you write “read_temp.Read_Temp()” instead of “read_temp.read_temp()” you will get this error.